
| glossary | menu | Normal | lg | hc | 1.) Fluvial Geomorphology Training Module > Data Viewing Exercise |
| < Previous | 1 | 2 | 3 | 4 | 5 | 6 | 7 | 8 | 9 | 10 | 11 | 12 | 13 | 14 | 15 | 16 | 17 | 18 | 19 | 20 | 21 | 22 | 23 | 24 | 25 | 26 | 27 | Next > |
Data Viewing Exercise

Exercise Objective
To become familiar with publicly available images of rivers and their flood plains.
Exercise Process
- Open the National Map basic viewer website, located at National Map Basic or the National Map advanced viewer website, located at National Map Advanced. If the links above are not working, search the Internet for an equivalent map viewer providing topographic maps with Elevation contours and rivers.
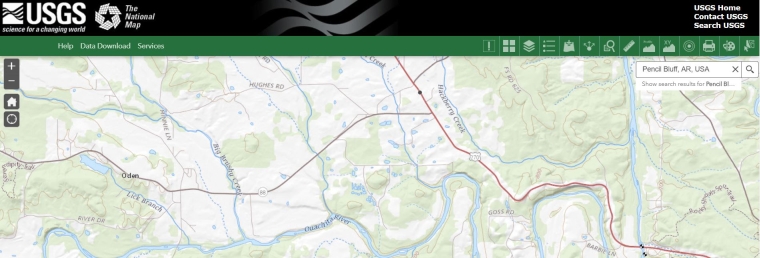
- In the map website, use the search location tool, entering river name, or its nearest town with state, to find a Reach of river, e.g., "Pencil Bluff, AR" to locate the Ouachita River to its south. A Reach is defined for this exercise as a section of river that is approximately 20 to 1000 times longer than it is wide. You may want to find a river monitored by the River Forecast Center (RFC), and you can get the name and state of this river by clicking into one of their regions and selecting a link to a river gauge within the RFC map.
- In the map viewer, use the zoom and pan functions to center the viewer over the river Reach, which should be colored blue in the basemap.
- In the map viewer, notice if there is curvature in the river Reach as it moves across the landscape. This type of pattern analysis illustrates the river planform assessment that is covered later in the FGM classification.
- In the map viewer, find the contour lines about the river Reach; you may need to zoom out or in to find these. Notice how these contour lines may approximately run parallel with the river in some sections or bend and cross perpendicular to the river in others, and how the contour line values tend to increase as you move up river or from the river into the Valley. This type of Elevation analysis illustrates a river profile and dimension analysis covered later in the FGM classification.
- Optionally, if using the National Map advanced viewer, try to examine the river using a) different basemaps and b) the measurement tools. In the National Map ribbon of tools, activate the Basemap Gallery to change the basemap to the USGS Imagery Topo, which provides aerial imagery (also called orthoimagery) and overlays the topographic map. In the National Map ribbon of tools, activate the Elevation Profile to measure change in Elevation along the river or across the Valley, or the Measurement tool to measure length of the river Reach, its Valley, or the area of the flood plain. Future FGM exercises will use the imageJ software to measure river features, but you may alternatively use the National Map to find and measure the river.
- Optionally, if using the National Map basic viewer, try to download a topographic map containing this river Reach. To do so, near the top of the window containing the map, select the radio button "Current Extent", then in the left of the window with Datasets, select US Topo as the Map product. Finally select "Find Products" to find a topographic map, add them to your cart, and download. In later FGM Module sections the topographic data are provided.
Image courtesy of TerraServer
| < Previous | 1 | 2 | 3 | 4 | 5 | 6 | 7 | 8 | 9 | 10 | 11 | 12 | 13 | 14 | 15 | 16 | 17 | 18 | 19 | 20 | 21 | 22 | 23 | 24 | 25 | 26 | 27 | Next > |